
Añadir varios proveedores de inicio de sesión único a Genesys Cloud
- Inicio de sesión único > Proveedor > Añadir, Eliminar, Editar, y Ver permisos
- Rol de administrador en la cuenta de proveedor de identidad de su organización
- Una única dirección de correo electrónico tanto para la cuenta del proveedor de identidad como para Genesys Cloud.
- Metadatos de su proveedor de identidad
- Un certificado público codificado de su proveedor de identidad
Genesys Cloud le permite configurar hasta 30 integraciones de inicio de sesión único (SSO) con el mismo proveedor de identidad o una combinación de proveedores de identidad. Para ayudarle a crear sus integraciones SSO, Genesys Cloud le permite importar a un archivo de metadatos SAML que reciba de su proveedor de identidades. La importación de un archivo de metadatos SAML, que contiene los detalles de configuración pertinentes y la información del certificado, rellena automáticamente los campos necesarios en la integración.
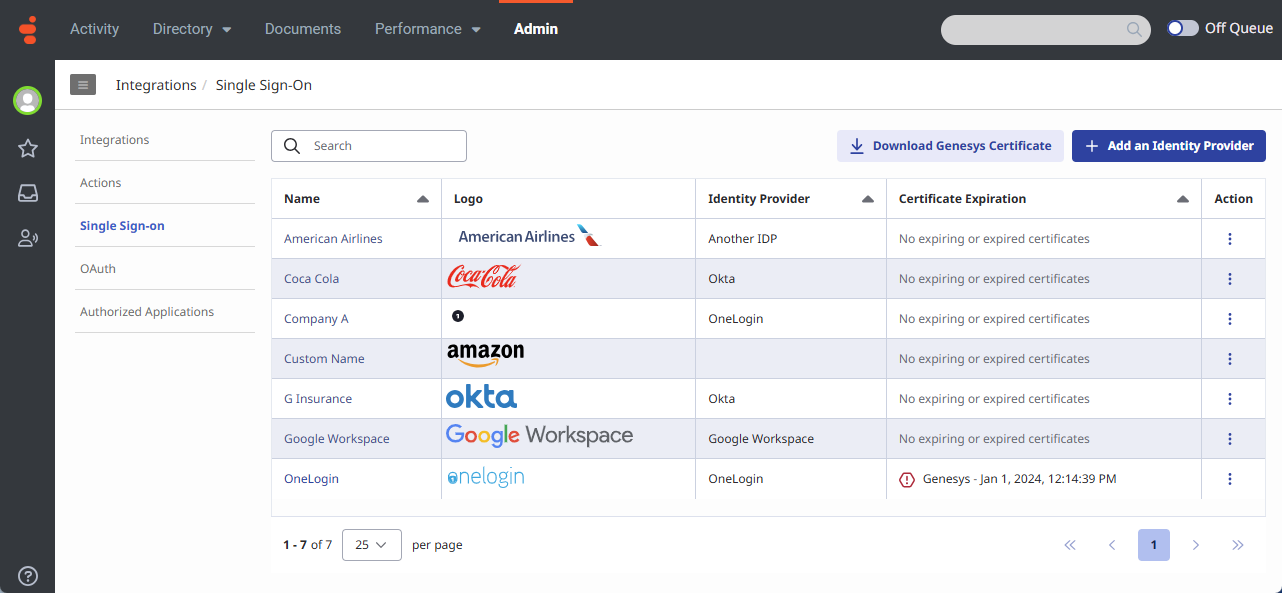
Página de inicio de sesión único
Para realizar un seguimiento de múltiples integraciones SSO, Genesys Cloud muestra las integraciones como una lista en la página Single Sign-On. La página ofrece un resumen de cada integración, incluidos el nombre de inicio de sesión, el logotipo, el proveedor de identidad y los datos de caducidad del certificado. En la columna Acción, haga clic en Más para mostrar un menú que le permite editar y eliminar una integración. En los encabezados de columna Nombre, Proveedor de identidad y Caducidad del certificado, haga clic en Ordenar para reorganizar la vista en orden ascendente o descendente.
La página también ofrece opciones que le permiten añadir un proveedor de identidad y descargar un certificado de Genesys. Para enviar un certificado de Genesys a un proveedor de identidades, haga clic en Descargar certificado de Genesys.
Haga clic en la imagen para ampliarla.
Personalizar la pantalla de inicio de sesión para cada integración SSO
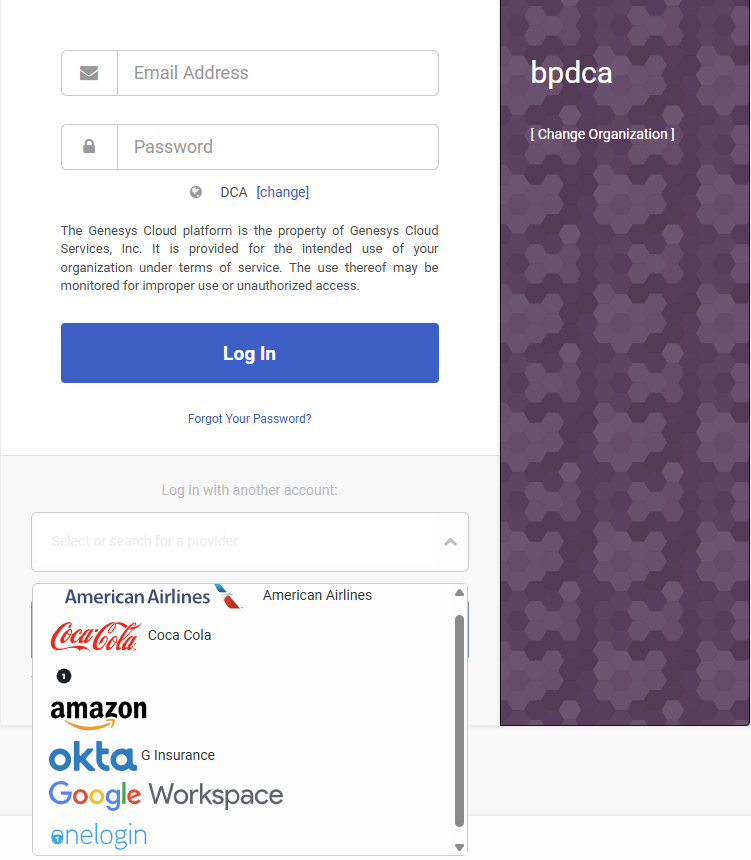
Puede personalizar la forma de mostrar cada integración SSO con un nombre de inicio de sesión diferente y un logotipo de su elección. Puede elegir mostrar el nombre o el logotipo, o ambos. La opción que elija determinará cómo se mostrará la integración SSO en la página de inicio de sesión única y de Genesys Cloud.
Para ahorrar espacio, sólo seis integraciones SSO aparecen directamente en la página de inicio de sesión de Genesys Cloud.
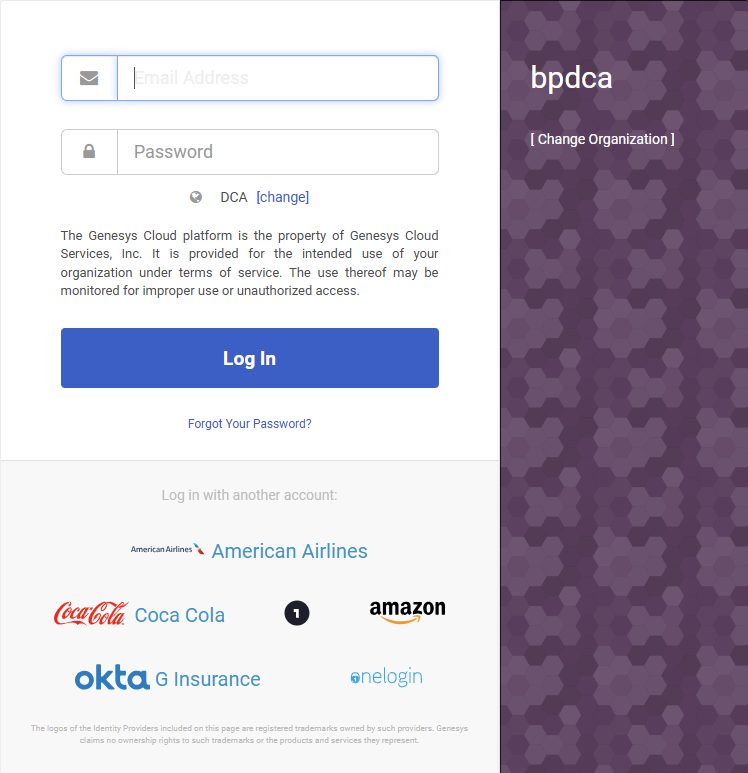
Si tiene más de seis integraciones SSO, aparecerán en una lista en la página de inicio de sesión.
Crear una integración SSO
Metadatos de Genesys Cloud
Para emparejar una integración SSO entre Genesys Cloud y un proveedor de identidades, configure los ajustes en ambos extremos. Los proveedores de identidad le proporcionan un archivo de metadatos que contiene el URI del emisor, el URI de inicio de sesión único y el URI de cierre de sesión único para que los introduzca en Genesys Cloud cuando configure la cuenta del proveedor de identidad de su organización. Puede generar un archivo de metadatos SAML con los metadatos de Genesys Cloud y la información del certificado que un proveedor de identidad debe utilizar para configurar los ajustes en su extremo.
Para crear una integración SSO:
- Hacer clic Administración.
- En Integrations, haga clic en Single Sign-on.
- Haga clic en Menú > TI e integraciones > Inicio de sesión único.
- Haga clic en Añadir un proveedor de identidad.
- Introduzca el nombre que desea asignar a su integración.
- Para mostrar el logotipo en la página de inicio de sesión de Genesys Cloud, seleccione Display Name On Login Page.Nota: Si tiene más de seis proveedores de identidad, la opción Mostrar nombre en la página de inicio de sesión no estará disponible.
- Haga clic en Identity Provider Name y podrá seleccionar uno de los proveedores de identidad disponibles, totalmente compatibles, o introducir un nuevo nombre de proveedor de identidad.Nota: La lista Nombre del proveedor de identidad contiene un conjunto de los proveedores más comunes. Si no ves a tu proveedor de identidad en la lista, puedes añadirlo escribiendo su nombre. Después de guardar la configuración, el nuevo proveedor de identidad aparece en la lista.
- Haga clic en Seleccione el logotipo y cargue el archivo de imagen del logotipo que desea mostrar en la página de inicio de sesión. También puede arrastrar y soltar el archivo de imagen del logotipo.Nota: El archivo de imagen del logotipo debe estar en formato SVG y no puede tener un tamaño superior a 25 KB.
- Para importar el archivo de metadatos que le envió su proveedor de identidades, en la sección Datos del proveedor de identidades, haga clic en Seleccionar metadatos SAML para importar. También puede arrastrar y soltar el archivo de metadatos.
Después de importar el archivo de metadatos, observe que los campos obligatorios se rellenan automáticamente y que el certificado público x509 codificado para la validación de firmas SAML está disponible.
| Campo | Descripción |
|---|---|
| URI del emisor | ID de emisor del proveedor de identidad. |
| URI de inicio de sesión único | URL de inicio de sesión único del proveedor de identidad. |
| Enlace de inicio de sesión único | El enlace de inicio de sesión especificado por su proveedor de identidad. |
| Firmar solicitudes de autenticación |
Seleccione la casilla de verificación Sign Authentication Requests si desea añadir una capa adicional de seguridad para comprobar que las solicitudes proceden de una fuente verificada. Nota: Como medida de seguridad adicional, Genesys Cloud le permite firmar las solicitudes de autenticación. Una solicitud de autenticación firmada es una solicitud SAML (Security Assertion Markup Language) que ha sido firmada digitalmente para garantizar su autenticidad e integridad. |
| URI de cierre de sesión único | La URL de cierre de sesión especificada por su proveedor de identidad. |
| Enlace de cierre de sesión único | El enlace de cierre de sesión especificado por su proveedor de identidad. Si no se especifica ningún enlace, seleccione Redirección HTTP. |
| Formato del identificador del nombre | El formato especificado por su proveedor de identidad. Si el formato es desconocido, seleccione Unspecified. |
| Certificado |
Certificados X.509 para la validación de firmas SAML. Los certificados cargados aparecen con su fecha de caducidad. Puede tener hasta cinco certificados por configuración SSO. Genesys Cloud elige el certificado correcto durante el inicio de sesión único y el cierre de sesión. Para cargar más certificados, click Seleccione certificados para cargar y cargue el certificado. También puede arrastrar y soltar el certificado. Para eliminar un certificado, haga clic en Eliminar |
- Hacer clic Ahorrar.
Datos del proveedor de servicios Genesys Cloud
Al hacer clic en Guardar, Genesys Cloud genera los metadatos SAML que su proveedor de identidad utiliza al configurar su cuenta de proveedor de identidad.
- Para descargar un archivo de metadatos SAML que contenga los metadatos de Genesys Cloud y la información del certificado que un proveedor de identidad debe utilizar para configurar los ajustes en su extremo, en Metadatos de Genesys Cloud, haga clic en Descargar metadatos.
- Si sólo necesita un certificado de Genesys para enviarlo a un proveedor de identidades, en Single Logout URI, haga clic en Descargar certificado.
Atributos SAML
Si los siguientes atributos SAML adicionales están presentes en la aserción, Genesys Cloud actúa sobre los atributos. Los atributos distinguen entre mayúsculas y minúsculas.
| Nombre del Atributo | Valor de atributo |
|---|---|
| Nombre de la Organización |
|
| Nombre del Servicio |
Una URL válida a la que se redireccionará el navegador después de una autenticación exitosa, o una de las siguientes palabras clave:
|